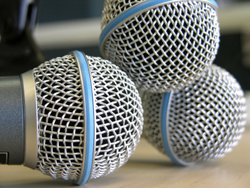
But for some reason the web seems to be awash in just that - poor, amateurish sounding (or referring to it by the technical term - crappy) audio.
Here's the thing that really makes me shake my head. Lots of folks, including the big names in the internet marketing community, create great-looking sales videos and then publish them with voice narration that sounds like it was recorded in a bathroom. Ironically, that same narration audio was probably recorded on a pretty expensive microphone.
The problem isn't the lack of expensive or high-end recording gear. It truly boils down to good old fashioned know-how. So let me ask you a question. Would you rather...
1. Create crappy audio with expensive gear?, or
2. Create professional sounding audio with inexpensive gear?
If you picked #2, you're in the right place. And since so many marketers on the internet seem to be doing #1 (referring to the above audio choices, that is), you can likely gain a bit of a competitive advantage without spending a dime just by putting the following tips into play:
1. Get Close to the Mic - Regardless of what mic you use, it is likely you're recording at your computer, which is probably in a spare room in your house. That just about guarantees a lot of "room sound." Sound bounces off the walls, ceiling and floors, creating copies of your voice. Then these copy-cat sounds collide with one another, making even more copies that are all mutated and not-very-nice sounding. All these "knock-off" versions of your voice then go racing for the microphone trying to beat the original sound to the finish line.
The further away from the microphone your lips are, the more mutant versions of your voice will get to the mic before the real thing. At best, the result will sound like the bathroom example I referred to above. But all sorts of other potential sound nastiness can also result. The solution? Make sure version 1.0 of your voice wins this race. You can accomplish this by making sure your lips are between 6 inches or less away from the mic. This is known as "close mic-ing" and will result in a better, and usually deeper and richer sound. That brings us to the second tip,
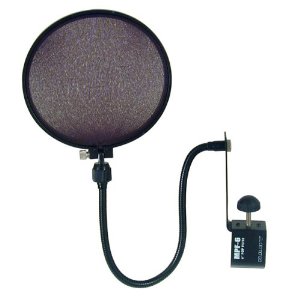
2. Beware of the P-Pops - When you use the close-mic technique with vocals, you will inevitably create p-pops, otherwise known as "plosives." These are unpleasant sounding little explosions of air that accompany plosive consonants such as Bs and most infamously, Ps. The first thing you can do to reduce plosives is to put a
However, in my experience even recording with a pop filter will not prevent all plosives from sneaking into the recording. When that happens, you'll want to open an audio editing program.
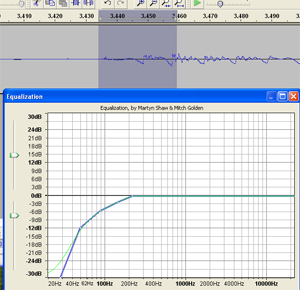
Audacity is a free editor you can use for this. Open the audio file in the editor, zoom in on the offending consonant and highlight just the "p" sound, taking care not to select any of the actual voice sound if possible (ex. if the word is "pop," try not to select any of the "ah" sound), and open the Equalization (or EQ) tool. All editing programs have one. Reduce the volume of the lower frequencies, from about 200 Hz and below.
Some experimenting will be helpful since all voices are different. A good place to start would be to lower the volume slider at 200 Hz just a little bit, then lower each subsequent frequency to the left a little more until the left-most slider is all the way down. See the picture below and to the right to understand this a bit better.

EQ for P-Pops
One other edit that often helps is to highlight the plosive in the editor again and use the "Fade In" tool. Again, every editor I've used has had one. In Audacity, find it under the "Effect" drop-down menu.
Oh, and don't tell anyone about this trick. I discovered it by accident one day and sometimes it works better than using EQ. It can be our little secret.
That leaves us with...
3. Avoid Distortion - Have you ever heard that terrible buzzing sound on audio that is too loud for the equipment? It happens on public address systems all the time. That is because the signal from the microphone is too "hot" for the amplifier and the sound distorts into a buzzy, ear-splitting, body-cringing distortion. This can, of course, happen in recording as well.
Ironically, this is more common with folks who use a more expensive recording setup because they usually use more electronic gizmos in their audio chain, such as the microphone plugged into an audio interface box, plugged into a computer. All too often the person will decide they can't hear the audio well enough while recording and will turn knobs (sometimes at random) until it sounds loud enough. Unfortunately this can cause the signal going from the interface box to be too loud for the computer input.
These audio interface boxes come with some kind of meters that you can see on the face of the box. Sometimes you just get two lights, a green one and a red one. Here's the hint. The red light should rarely, if ever, light up while you record. The goal is to see MUCH more green than red. If you see lots of red, turn down the "gain" knob on the interface box. If the audio isn't sounding loud enough in your headphones (never record with the speakers on if the mic is in the same room), then make sure the knob you turn up is the "headphones" knob and NOT the gain knob.
The good news for those of you using USB mics plugged directly into your computer is that distortion is rarely a problem. Just make sure that any software meters (like the ones on programs like Camtasia or in the Windows mixer) also stay "in the green" by adjusting the virtual volume sliders in those programs.
So there you have it. These three tips, which don't require you to buy anything at all, can make the difference between a mediocre or amateurish presentation to a professional one. This is one more example of our motto at Home Brew Audio - Knowledge Trumps Gear. Said another way, if you know just a little bit about audio, you can save yourself a boatload of money and time.
Good luck recording your professional podcasts and videos!
- by Ken Theriot of Home Recording Studio
Like these tips? Be sure to visit Ken's website for more! 😉


Thanks Lynn........cheap and easy, that's what I like. Do you have to buy a pop filter or can you make/create one somehow?
Hi Lynne
Great topic and well covered. Great job.
Hayley
When i tried to record some tutorials in the past, i really struggled with producing a high quality sound. I used Camtasia to do the capture. But no matter how i talked, i always had a problem with the sound. It's really hard to find a good and reliable Mic.
LOL! The P-Pops. That made me laugh. Quite true, however, quite true.
I once made a video tutorial once and didn't realize until I watched it that I coughed through the whole thing...LOL!!!
Obviously couldn't use it.
Mark
When not using the the mic from my USB headset, I revert back to an old (30years) high end mic I still have. Applying the 6 inch rule is standard.
What helps me to get rid of sound reflections is that I covered the ceiling of my 'studio' with egg cartons. The uneven shape plus the rough surface helps a lot in reducing reflections and leads to a better (warmer) sound.
Great tips Lynn, I wished I had known these when I started creating my Getting Started with WordPress course. I had to learn from scratch about audio recording and wasted a lot of time doing so.
I would also recommend investing in a USB mic. I use the MXL USB.006 which I'm very happy with. If you're not willing to spend as much then the Logitech Clearchat headset is a good alternative.
Finally if you really can't avoid recording unwanted ambient sounds (ambient, not your mouth & breathing sounds), I highly recommend the SoundSoap program.
That's a bit of money to spend but it should still fall into the inexpensive category (< $300) 😀
Crappy audio has been the standard for podcasts for many years, don't take that away from us! I'm afraid we won't be able to understand the clear words after so much time we were forced to listen to noise.
I've been a voice over actor for over 30 years as well as a blogger and the one thing that annoys me the most in audio recordings done by marketers is lip smacking. The simple solution is to have a glass of water before you start recording. Or, eat a couple green apple slices. It helps. Don't try to record a large amount of content at a time. Take a break, have a sip of water and continue.
good stuff. a way to reduce the pop sound without having to buy a pop filter is to use a light scarf over the mic. I use a light chiffon scarf, doubled up a couple of times and its very effective. Looks funny but works 🙂
As a DJ, I've found that I have to use something over the mic to avoid the "P" pop. There's also nothing more important than spending a bit of time running mic checks and ensuring you have the right levels for the venue! There is no reason for poor audio quality with the technology around today!
Gtreat advice here. Does anyone know what type of mic I should use to go with my samsung digital camera for when I'm making outside recordings? It's a great little number with good visual mostly, but pics up too much (SSSSCCCCRRRGGGGGG...if you get the jist?!) from the wind etc and also my coice is too quiet when using it from more than a meter away. thanks:)
Excellent advice Lynn! I absolutely bombed the audio on my first YouTube tutorial video. I must have made the video 6 different times before figuring out my built in microphone was the problem.
These three tips should make my next video a breeze though. Thanks for sharing!
Well I think another short cut can be downloading a audio quality software from torrent. Jokes apart, once I tried to record my voice in the open air but quite place and the result was satisfactory. I use my headphones mic rather than using a some special and it really gives a satisfactory result