 This may seem like "basic information", but I discovered recently that some of these little tips & tricks aren't exactly common knowledge.
In this tutorial, I'm going to walk you through the use of images & pictures in WordPress... and some of the most common mistakes you should avoid.
We'll take a look at one of my own blog posts as a live example, which I just published this morning, and I'll walk you through the details. Some of which you may have totally missed no matter how long you've been using WordPress!
I'll share some GREAT (must-use!) Image Optimization tips with you as well. 🙂
Start With A Basic Blog Post Outline
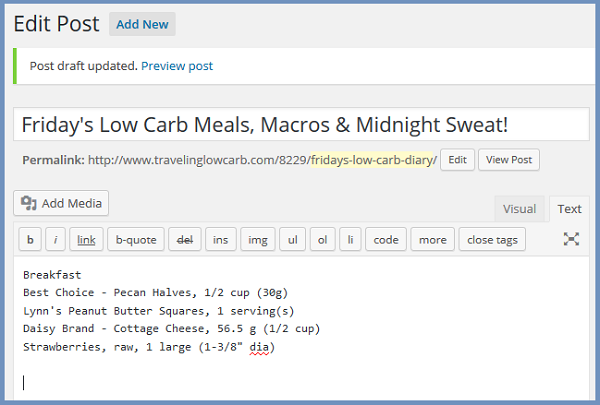
I always start with a draft and a basic outline of my blog post content. This is the post I already published earlier today, while it was still in "first draft" state:
See: Blog Post Outline Tutorial
Sometimes I draft the content for my blog post first and then add the images, other times I add the images first and then draft the content around them. It doesn't really matter which way you do it. For me it depends on whether the images inspire the content, or the images simply illustrate the content.
For this live example, I was writing one of my typical daily posts on my low carb blog, which is a "food journal post" - sharing my low carb meal diary for the day.
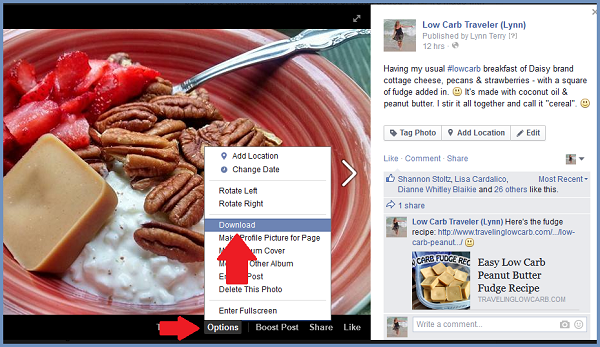
I usually share all of my meals throughout the day on social media, so the photos are already on my Facebook Page. Other photos are likely still on my phone, so I usually just email those to myself (if there's only one or two) or download them from my phone via USB (if there are several).
Add Photos or Images To Your Blog Post
For the first picture in this blog post, I just went to my Facebook Page and downloaded the photo to my hard drive.
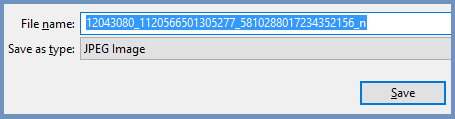
TIP: When you save the file, change the file name to something descriptive (a keyword phrase). The file name is part of your overall Image Optimization. 😉
For more on this, read: Internet Marketing & SEO In 2015
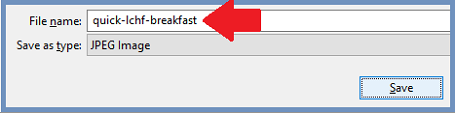
Once you change the file name and save the file, insert the image into your blog post. Place cursor where you want the image to appear in your post, then click the Add Media button above the composition window.
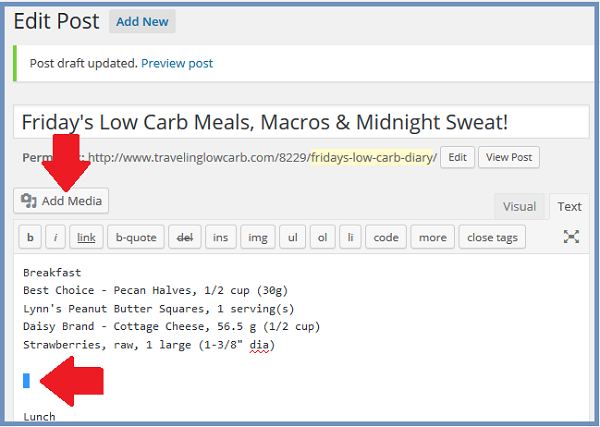
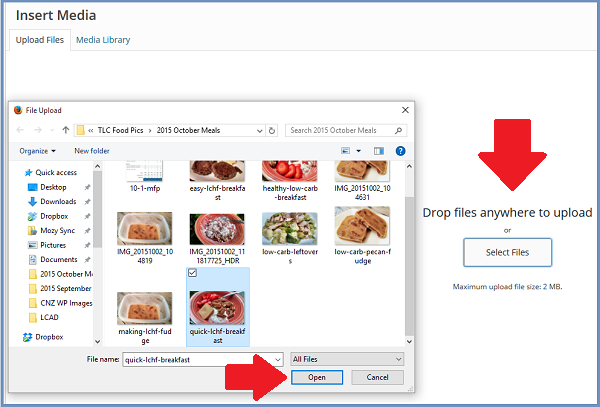
You have two options for adding an image to your blog post: Media Library (images you've already uploaded to WordPress) - or Upload Files. Click the Upload tab and either drag & drop a picture onto that screen, or click "Select Files" and choose the image you want to add to your post.
WordPress Image Optimization Tips
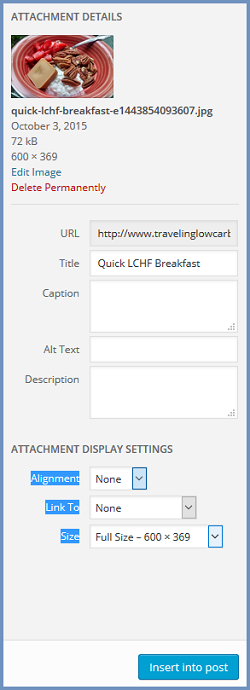
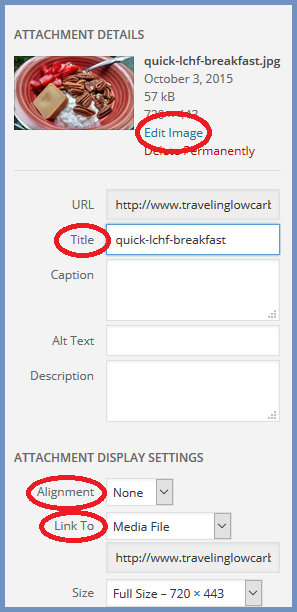 Once your image file uploads, the next screen you see gives you several options.
I highlighted the most important options, which result in the most common mistakes I see with WordPress images.
Let's walk through the options...
1. By default, WordPress will usually "Link To: Media File". You MUST change this to "None" or "Custom". Otherwise the image will just link to itself, which is really confusing for your readers - and a waste of a hyperlink.
Link your images to something useful or relevant, or remove the link altogether.
2. The Title field is VERY important. It's a descriptive title of the image, and should include your keywords.
NOTE: The Image Title is also the text that shows up on Pinterest in the description area when someone pins your images. 😉 Be strategic here!
3. Alignment allows you to align images with content, so your text wraps around your image - or so it does NOT.
The image to the right is aligned to the right. The larger images above and below are aligned "None".
There is nothing worse than badly aligned images in WordPress, as it creates a lot of unnecessary "white space" that ruins the flow of your blog post. Meaning - it makes it hard to read. 😛 Nothing except perhaps... badly sized images.
How To Crop & Resize Images Inside WordPress
When you first upload a picture or image to WordPress, you see the screen above that we just walked through. At the very top is the option to "Edit Image". This is where you'll be able to crop and resize your photo.
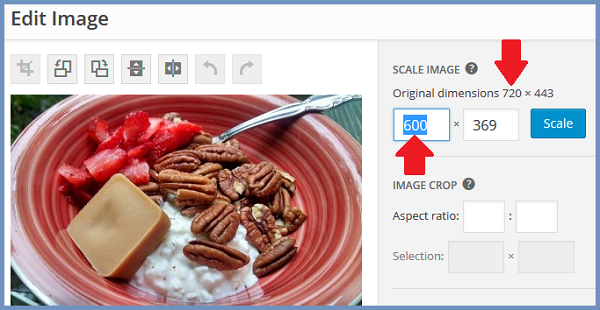
TIP: Change width of your picture or image to the width of your content area. My content area is 600 pixels wide, so I use images that are the same width. You want your images to be large and easy to see/read. People LIKE "big images". 🙂 Don't worry, they'll scale down in the mobile version of your site.
When you click the Edit Image link, you can easily scale your image to a smaller size. In this case, with the photo I downloaded from my Facebook Page, I needed it to be only 600 pixels wide. I changed the width to 600, and the height automatically adjusted. Then you just click "Scale" and wait for it to say "Image Saved" at the top left (above the image). Click the Back button at the bottom right of the screen after that.
WordPress Image Display Settings
 Note: When you "scale the image" inside WordPress it creates a new version of the image at the smaller size. This is the image you'll be adding to your blog post.
If you just use the "Size" option to show a smaller size of the image in your post, it will still have to load the full image - which slows down your load time dramatically.
The larger image is still on your server after you scale it, but the new smaller image is the one used in your post - and the one that will load with the page, which is fine.
Before you insert the image or photo into your blog post, double check each of the Image Display Settings.
Always use the "Full Size" option for your images - for the reasons I shared above.
Align your smaller images left or right to avoid annoying white space in your blog posts.
If you use a larger image, select "None" for the Alignment option. Otherwise your post will go all wonky!
Change the Link To: option to "None".
Add a descriptive Title to your images, for Image Optimization and Pinterest descriptions.
Happy with your image and the options?
Great!
Click the "Insert Into Post" button.
Don't worry - this only takes a few short seconds once you get in the habit of doing it. 🙂 It just looks like a lot to do when I spread it all out with words and big images -lol. And it makes a BIG difference!
Crop & Resize Larger Images Before Uploading
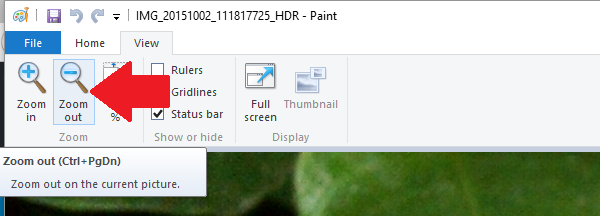
For larger images that I download from my phone, I open those in Paint first (any simple graphics program will do). There's no sense cluttering up your server or your WordPress database with HUGE images. And WordPress won't usually let you upload anything larger than 2MB anyway.
Paint is free and already loaded on any Windows machine.
Open Paint, click File > Open and select your image. Or right click on your image and select "Open With: Paint".
There are two tabs at the top: Home and View. Click View, then zoom out so you can see the whole image so you can edit it.
Once you zoom out, go back to the Home tab and use the Select option to select the area you want to keep, then click the Crop button just to the right of that.
Once you crop anything extra out of the picture, resize it to the width of your blog's content area - or the width you want to use in your blog post.

Save the image with a descriptive file name (I use the PNG format here), then upload it to WordPress. 🙂 Easy!
How To Crop Images Inside WordPress
If you have already uploaded an image to WordPress, you can also use the crop tool right inside WordPress using the "Edit Image" options.
Choose the image from your Media Library, click Edit Image, and on the next screen you can drag your mouse to select the area of the image you want. When you have it selected, click the Crop icon at the top right.
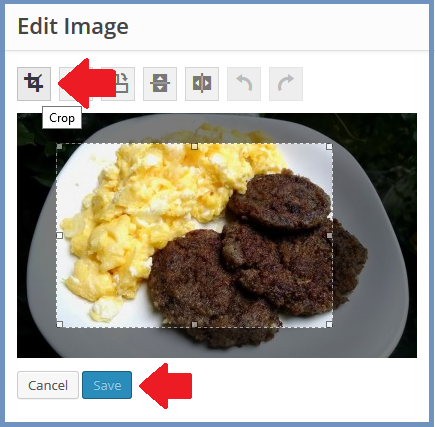
Once your image is cropped, click Save.
How To Capture Screenshots To Illustrate Blog Posts
Screenshots are a great way to illustrate your blog posts. Er, you're looking at a live example of that right now. 🙂
You don't need a special program to capture screenshots. I'm very minimalist with my computers, so I use as few tools and downloads as humanly possible.
All you have to do is click the "Print Screen" key on your windows keyboard to capture the entire screen. Or hold down the ALT button and then click the Print Screen button to only capture the window that is currently option.
If you're on a Mac, use CTRL+SHIFT+4 and select the area of the screen you want to capture. Once you drag your mouse and select the area, let go of the mouse and the image will save to your desktop.
Then open your favorite free graphics program (like Paint) and go to File > New and then Edit > Paste (or hold down CTRL and tap the "V" key: CTRL +V) to paste the screenshot into your program so you can crop and/or resize it. Be sure to save it with a descriptive file name. Simple enough!
The blog post you're reading is a live example of everything I've shared with you here. You can also see my low carb blog at TravelingLowCarb.com as another live example, including the post I used for the example in the screenshots above.
Did you pick up anything new in this tutorial? 🙂
Best,

p.s. High quality eye-catching pictures and graphics will dramatically increase your click-through rate both in search, and across all of the social media platforms too. Images get clicks. It's something you should definitely be focusing on right now in your online marketing strategy! See this Case Study with RESULTS.
For creating graphics to illustrate blog posts & sales pages I use these image templates a lot.
They come in very handy! 🙂
Be sure to download this
FREE Visual Marketing Guide
Questions, thoughts? Leave a comment! 🙂


Great post LYNN, although I have to say the Brainstorming Hour where it originated, better, so if readers aren't a member of the private forum they should consider it!
I just wanted to quickly share two pieces of software I use every day with images. The first is Jing, a free open-source screen capture that will selectively capture just what you want from your screen, image or video. The second is PhotoSync, an app available for iOS, Android and any PC that makes transferring pics to and from any of your mobile devices and computers super simple.
Thanks again for the great article!
~Marge
It was definitely super-fast via screen sharing during Brainstorming Hour, compared to outlining it in text & images here. 🙂
I've heard of both programs, but it's easy enough to capture screenshots on any computer or device already without using third party software. The same for transferring images. But that's just me - I run very minimalist on all my devices. Less update issues, less space used, less potential conflicts & such.
Thanks for that. Didn't know the difference between scaling and sizing before. Very helpful tip.
You're welcome, May. 🙂 It's an important distinction as just using a different size has a dramatic impact on your blog's load time, versus scaling the image down and loading a smaller version. Glad you enjoyed it! *cheers*
I always do the work with pictures before uploading, but great to now about the possibilities.
Really great post.People miss those tricks so often. Linking to a custom URL rather than the image is a must.And for image SEO, having a relevant image name and alt tag content is crucial, yet so many wordpress users ignore it.
Hi Lynn,
I was very pleased when I realized a little while ago that you normally do not have to resize images outside of WordPress to insert them so they'll load. I know their first attempts were not great and left huge image files but now they've built in the resizing and file reduction into the software and it's awesome!
Jeff
Hi Lynn
As you said resizing is simple but there are tricks tri follow it the right way.
I am grateful to read your step by step resizing methods.
Definitely I am going to use it and develop from there
Once again thank you
Great piece of information, something that I now keep on speed dial.
Wordpress allows you to add a featured image to a post. Would you handle that the same way or differently.
Thanks
David
Hi David,
Yes, I handle the Featured Image the same way. And it's very important to set a Featured Image for each post - as this is the image that is pulled when your post gets shared on social media sites, so you want to be sure you hand pick it. 🙂
Pretty cool Lynn. Ah, I knew a lot of this (makes me feel smart LOL). I knew I could crop images in WP, but once I crop them (and make a mistake) I can't find a way to undo it. Have you found a way to do undo a mistake?
Hi Sara,
Once you crop it, if you aren't happy with it - just don't click "save". If you already did save the image, it saves as a new image. Just go into your Media Library and find the original. 🙂
Simple. I wonder why I never noticed I was clicking on save...
Thank you Lynn.